How to Facilitate Multicast Routing when only One Palo Alto Networks Firewall Between the Sender and Recipients
90834
Created On 09/25/18 17:46 PM - Last Modified 01/31/25 20:38 PM
Procedure
Details
This document describes how to configure the Palo Alto Networks firewall to allow multicast traffic between zones.
Static Rendezvous Point (RP), IGMP and Security Policy Configuration Steps
-
- From the WebGUI, go to Network > Virtual Routers > Multicast
- Enable Multicast
- Select Static RP, RP Interface and IP of one of the Zones that will participate in Multicast
- Add designated Multicast Group IP
- From the Interfaces Tab add the Multicast / Interface Group and include all interfaces participating in multicast.
- Enable IGMP and PIM on all interfaces
Note: The firewall has to have PIM enabled, otherwise multicast routing would fail
- Enable IGMP and PIM on all interfaces
- Configure security policy to allow multicast traffic
- Include all multicast zones for Source Zone
- Use predefine Multicast Zone for Destination Zone
Note: Do not create this Zone it is a predefined Zone.
- Commit the configuration
- From the WebGUI, go to Network > Virtual Routers > Multicast
For Testing and Verification of Multicast Traffic
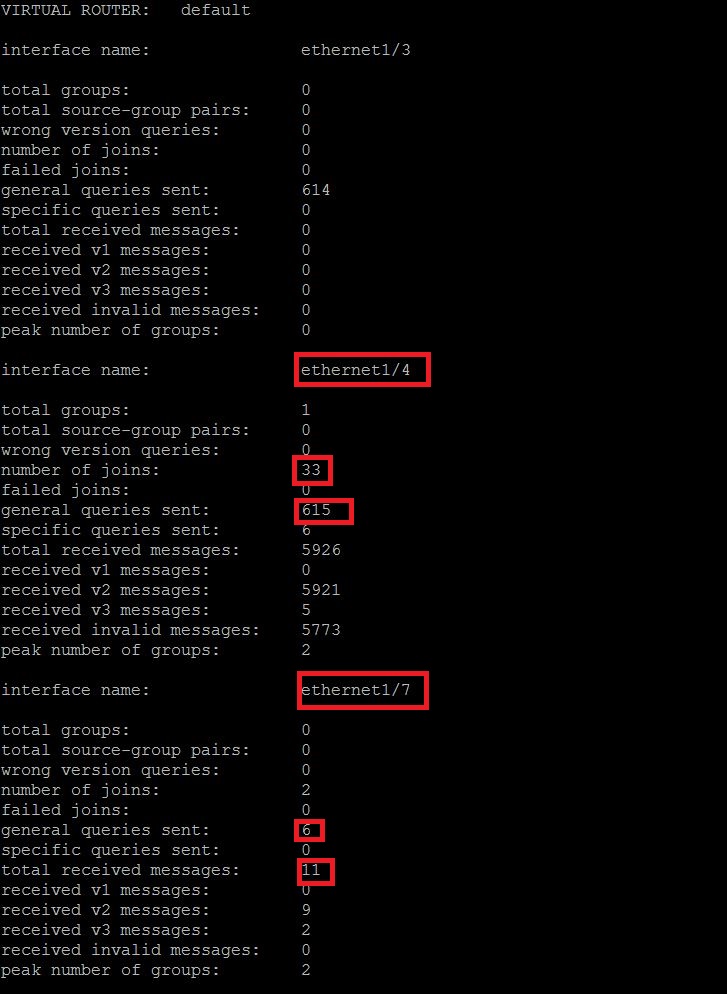
- Verify multicast IGMP membership. All interfaces with current IGMP traffic should be shown:
- Run the CLI command: > show routing multicast igmp statistics
Interfaces that are currently processing multicast traffic should have a positive number of joins and queries sent
Note: In the example below, the Interface Name - ethernet1/3 there are not any 'number of joins" because there were no clients that were requesting to join on that network.
- Run the following CLI command: > show routing multicast pim state
Verify the Sender IP. In this example, it is 192.168.61.216 - Run the following CLI Command: > show routing multicast fib
Verify the multicast group that includes designated multicast interfaces