What is GlobalProtect with User-logon (Always On)?
As the name says, user-logon, the GlobalProtect is connected after a user logs on to a machine. When this is used with SSO (Windows only) or save user credentials (MAC) , the GlobalProtect gets connected automatically after the user logs into the machine. The idea behind user-logon is to have the user 'always' stay connected to GlobalProtect. Once connected to GlobalProtect, the user will see the 'disable' option (if allowed by admin) to disable the GlobalProtect application when needed.
This document explains basic GlobalProtect configuration for user-logon with the following considerations:
- Authentication - local database
- Same interface serving as portal and gateway.
- Root, intermediate and server certs are generated on PAN
1. Generate a root CA, intermediate CA and a server cert as explained in this document:
https://knowledgebase.paloaltonetworks.com/KCSArticleDetail?id=kA10g000000ClFoCAK

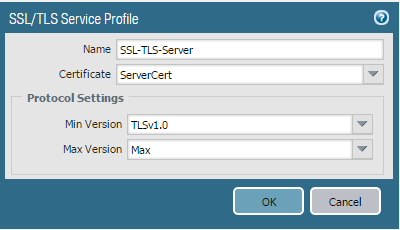
2. Create an SSL/TLS profile under Device > Certificate Management > SSL/TLS service profile, referencing the above created 'server certificate'.
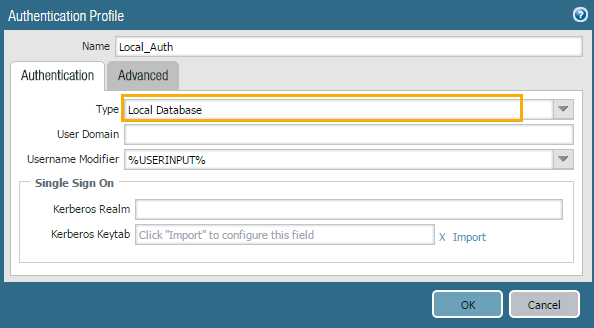
3. Create an authentication profile under Device > Authentication Profile > Add.
Name- Give a name to this authentication profile
Type - Choose Local Database(You may choose ldap,radius etc depending on your requirement)
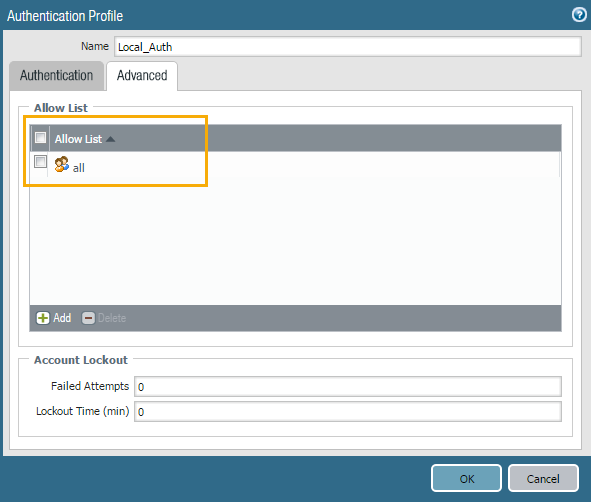
Advanced Tab > Allow List>Add - Select all (If you have groups, you may restrict it to required groups)
Click OK to save.
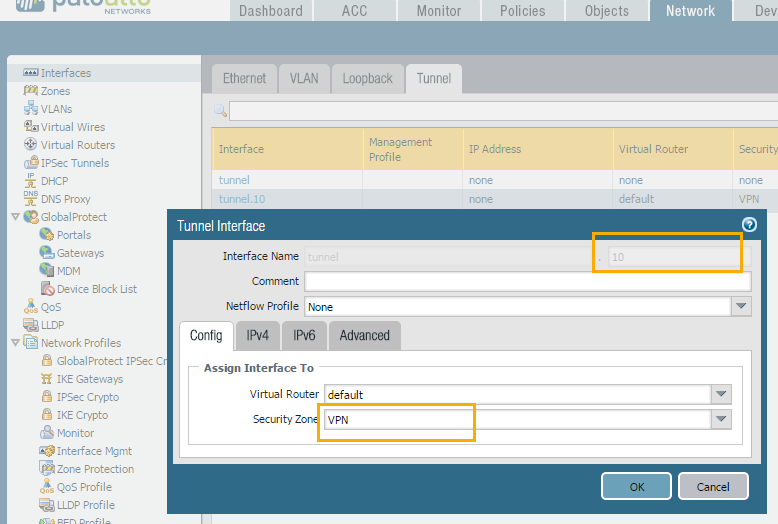
4. Create a tunnel interface under Network > Interfaces > Tunnel. Give a tunnel number, virtual router and security zone. We recommend creating a separate zone for VPN traffic as it gives better flexibility and more security to create separate security rules for the VPN traffic.
Configure GlobalProtect Portal
5. Go to Network > GlobalProtect > Portals > Add.
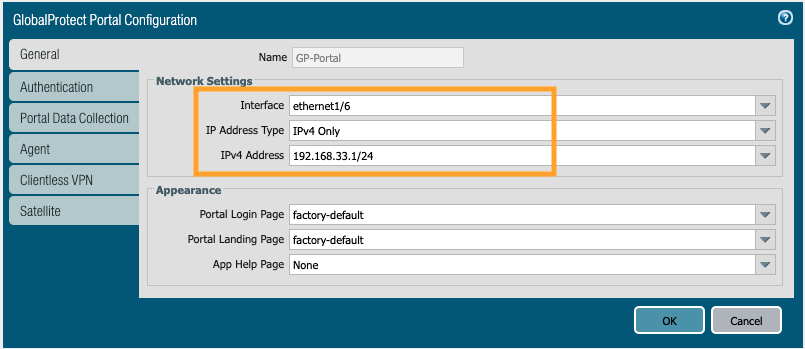
General Tab. Give a name to the portal and select the interface that serves as portal from the drop down.
6. Authentication Tab
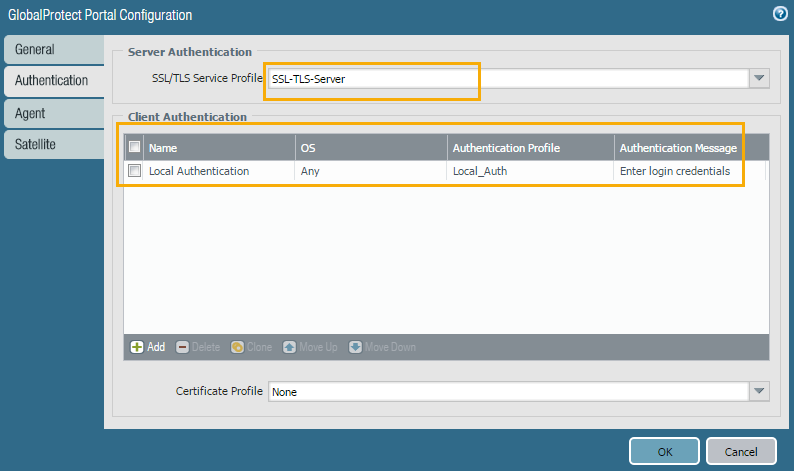
a. Under SSL/TLS service profile, select the SSL/TLS profile created in step 2 from the drop-down.
b. Client Authentication>Add. Give any name to it, leave the OS to 'any' unless you want to restrict it. Under authentication profile, select the auth profile created in Step 3.
c. Click ok to save.
7. Agent Tab. Add a new client config
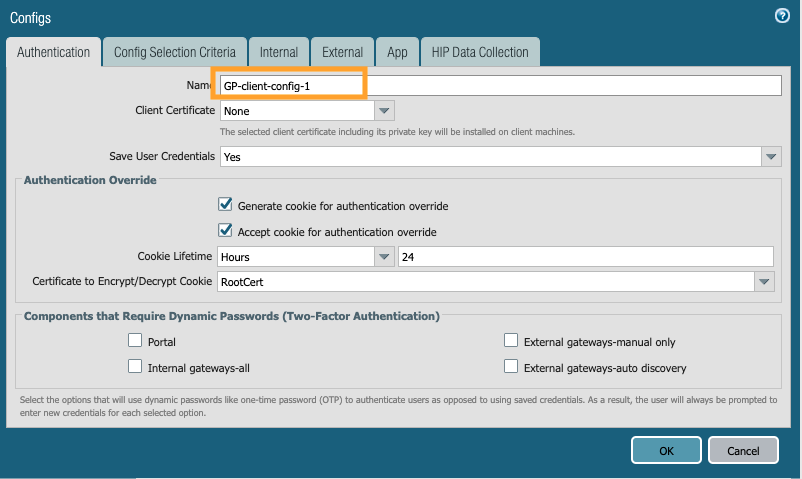
a. Authentication tab:
- Give any name to this client config
- Client certificate - leave it as none, this will only be needed if we want to push any client certificate to clients for authentication purpose.
- Save user credentials - Yes (default)
- (Optional) Authentication override: Check the boxes for 'Generate cookie for authentication override' and 'Accept cookie for authentication override'. This cookie can be encrypted/decrypted using any certificate that is selected from the drop down of 'Certificate to Encrypt/Decrypt Cookie'. Note: If a certificate is selected here under portal, the same certificate needs to be selected under Gateway's config for encrypt/decrypt cookie.
b. Config Selection Criteria tab. Leave the OS and User group to 'any' (You may restrict it to required groups, if needed)
IMPORTANT!
External tab.
c. Under 'External gateways', click Add. Give any name to it.
Address- Enter the IP address or FQDN which was referenced in the certificate Common Name(CN) or Subject Alternate Name(SAN) of Step 1. In this example we enter 'gp.portal-gw01.local'

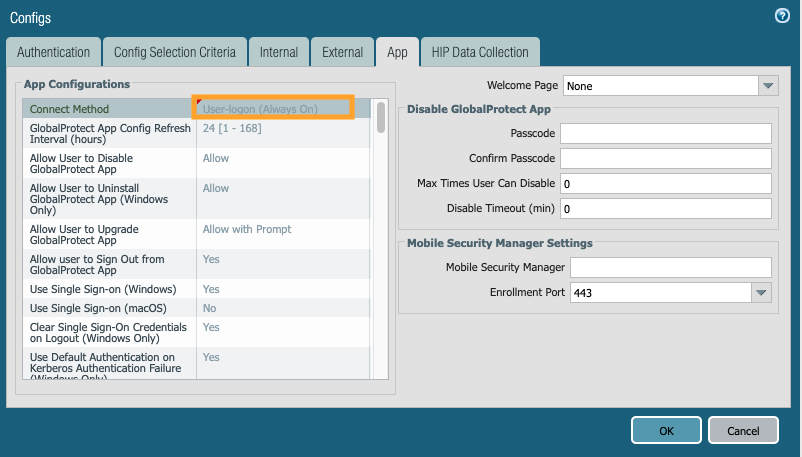
d. App tab. Under 'Connect-method' drop down, select 'User-logon (Always On)'.
Note: To change this GP setup from 'User-logon' to 'On-demand', just change the 'connect-method' from 'user-logon' to 'on-demand'.
e. Click OK to save.
f. Under 'Trusted Root CA', select the root CA and intermediate CA. Also, select 'Install in Local root certificate store' to install these certificates in the client's local root certificate store after the client successfully connects to the portal for first time.
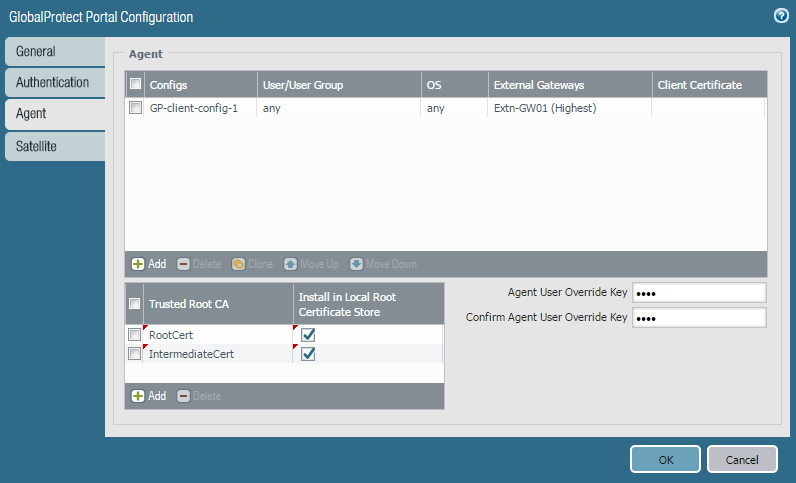
g. Click OK to save and close GP portal config.
Configure GlobalProtect Gateway
8. Go to Network > GlobalProtect > Gateways > Add.
General Tab. Give a name to the gateway and select the interface that serves as gateway from the drop down.

9. Authentication Tab. This is similar to step 6 but this is for gateway.
a. Under SSL/TLS service profile, select the SSL/TLS profile created in step 2 from the drop-down.
b. Client Authentication>Add. Give any name to it, leave the OS to 'any' unless you want to restrict it. Under authentication profile, select the auth profile created in Step 3.
c. Click ok to save.
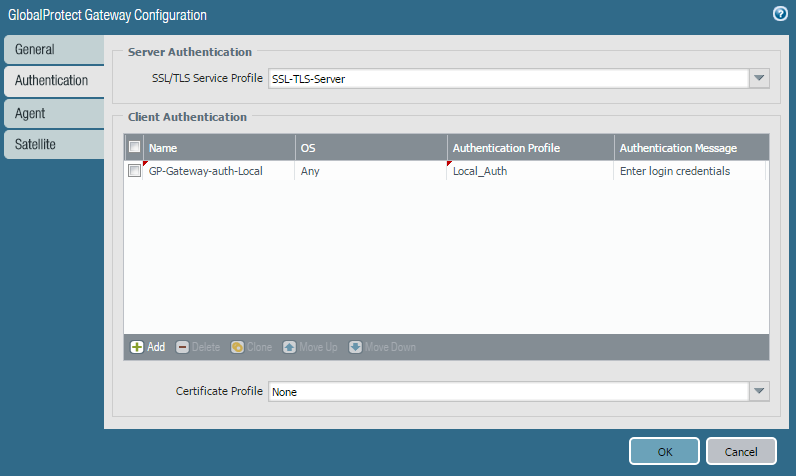
10. Agent Tab.
a. Tunnel Settings. Check 'Tunnel mode' to enable tunnel mode and select the tunnel interface created in step 4 from the drop-down.
b. Enable IPSec. Check this box to enable IPSec, this is highly recommended. With this setting enabled, GP will always try to first connect over IPSec, if it fails then GP falls back to SSL.
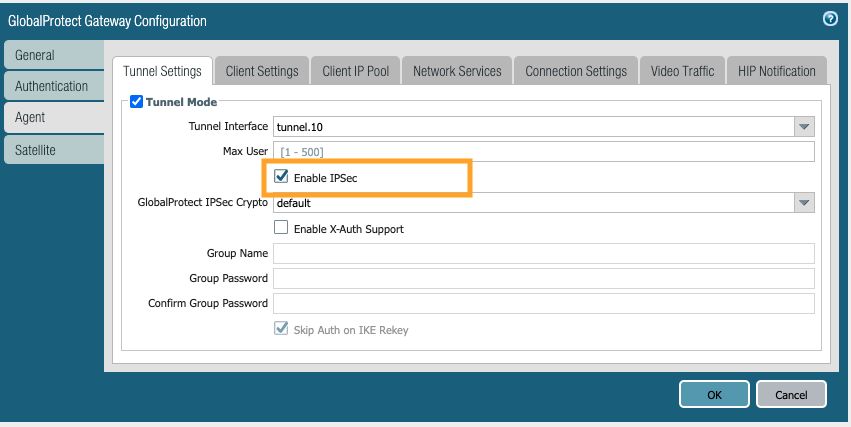
c. Timeout settings - leave them to defaults. For any changes to this, refer to the GlobalProtect admin guide.
d. Client settings
Click Add> Give a name to authentication override tab
-(Optional) Authentication override: Check the boxes for 'Generate cookie for authentication override' and 'Accept cookie for authentication override'. This cookie can be encrypted/decrypted using any certificate selected from the drop down of 'Certificate to Encrypt/Decrypt Cookie'. Note: If a certificate was selected in step 7 under portal, the same certificate needs to be selected here under Gateway 'certificate to encrypt/decrypt cookie'.
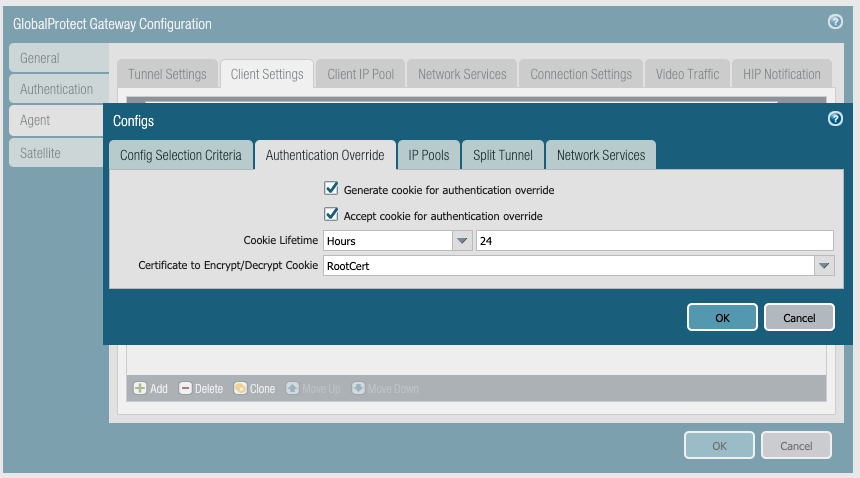
e. Config Selection Criteria tab. Leave the OS and User group to 'any' (you may restrict it to required groups if wanted).
IMPORTANT!
If a group is chosen from the drop-down, make sure that the GlobalProtect user is part of this group, if not the client will NOT receive an IP address from gateway. Common issues here are when the user is identified by GlobalProtect as 'domain\user' but the firewall's userid may have it as 'fully qualified domain\user', in those cases make sure the group/user is shown as identical at both places by overwriting domain field in user-identification>group mapping.
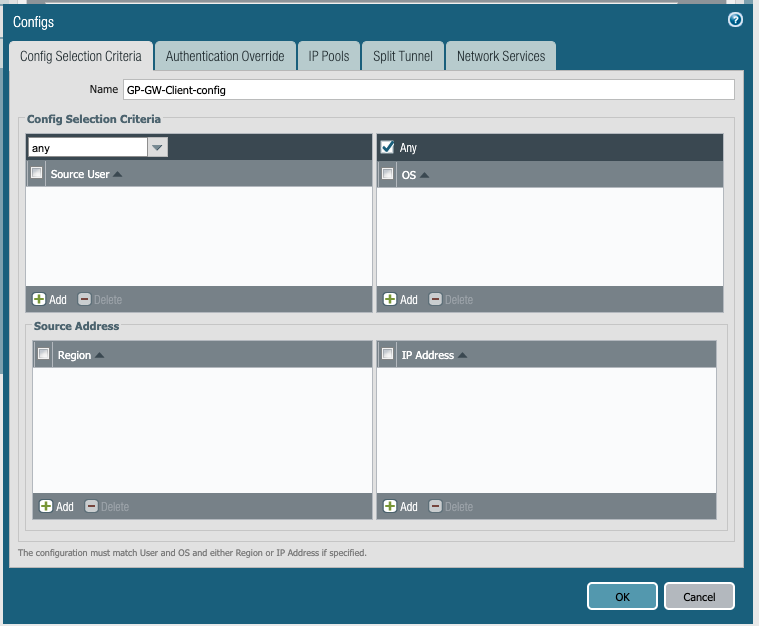
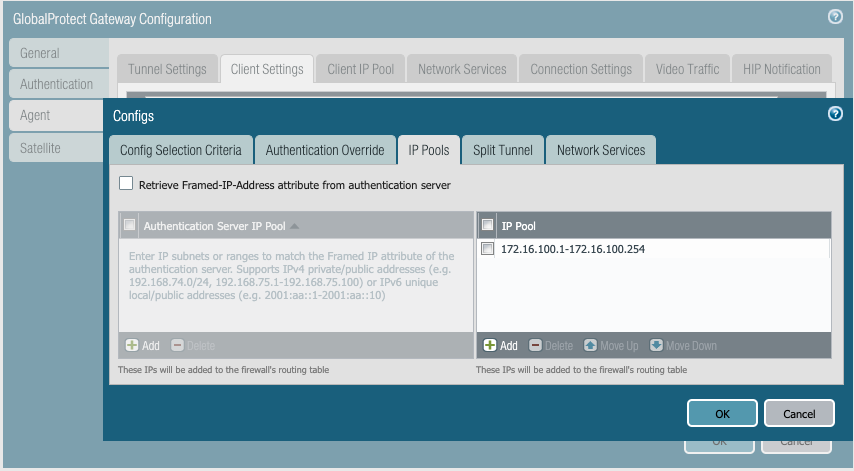
f. IP-pools:
IMPORTANT!
- GlobalProtect gateway will be assigning IPs from this pool to clients. Specify the one or more IP pool ranges which DO NOT OVERLAP with any of the existing networks in the organization. Overlapping subnets can cause routing issues and network outages.
- (Optional but recommended) You can add a second IP pool range for backup which will be useful in cases where the user connects a wifi that is providing the same IP pool range as your primary IP pool.
g. Split Tunnel > Access Route. This defines which subnets can be reached by GlobalProtect clients once they are connected to gateway.
-If 'Include' is left blank, it takes it as 0.0.0.0/0 i.e. all the traffic from the GlobalProtect client will be forced to go through GlobalProtect tunnel.
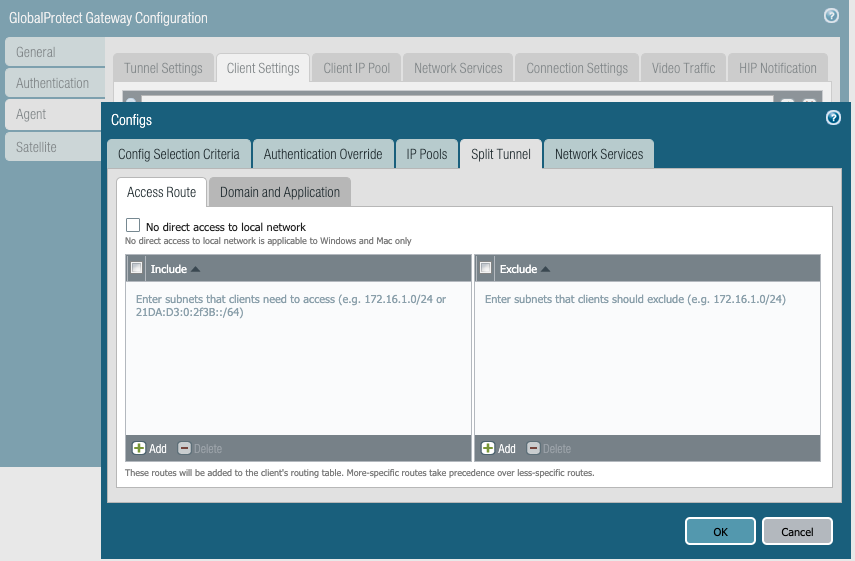
For Split tunneling: Specify the required internal subnets like 10.0.0.0/8, 192.168.x.0/24 etc. so that the GlobalProtect client will use the tunnel to reach only these subnets. Anything outside these subnets will be accessed directly from the client's local network, this is called split tunneling.
h. Click OK to save and close client settings. One more OK to save and close GlobalProtect gateway settings.
11. Create a local username/password under Device > Local user database>users for testing.
12. Create security and NAT policies for the newly created VPN zone to give access appropriately.
13. Commit the changes.
To test on client machine
1. From the browser, go to https://gp.portal-gw01.local/ ie https://<portal-ip/fqdn>
2. Enter the credentials
3. Download the GlobalProtect client
4. In the GlobalProtect client, enter the portal address and credentials, click connect.