How To Enable a Third-Party Identity Provider (IdP)
Environment
Customer Support Portal (CSP)
Resolution
Third-Party IdP: Enable an Identity Provider
Summary
What is a Third-Party Identity Provider?
Prerequisites
Enable Third-Party Identity Provider
(Optional) Generate Service Provider (SP) Metadata
Verify SSO login
FAQs
Why am I unable to access the SSO Settings page?
Who do I contact if I run into SSO issues after migration?
Are there other changes in the way users are added to the support portal?
Why is the Identity Provider rejecting the SAML Response?
How to renew the SSO IdP Certificate
KB Link: https://knowledgebase.paloaltonetworks.com/KCSArticleDetail?id=kA14u000000sZ8mCAE
Summary
This document covers the details of how to enable third-party identity provider (IdP) for SSO.
Enabling the Third-Party IdP option in the Customer Support Portal (CSP) allows account members to log in using their own corporate credentials.
Since a third-party IdP is set up at the domain level, members can belong to and log into multiple CSP accounts using their corporate SSO.
This means that once a third-party IdP is enabled at the domain level, it applies to all users across all CSP accounts.
They can also log in to other Palo Alto Networks applications using the same setup.
What is a Third-Party Identity Provider?
Palo Alto Networks allows customers and partners to bring their own identity provider to access Palo Alto Networks resources, e.g., Customer Support Portal. SSO Administrator accounts will be an exception, they will continue to use Palo Alto Networks credentials. We only support one identity provider per account.
NOTE: Once you have enabled a third-party identity provider, all Palo Alto Networks applications that use SSO will also be federated (Eg: Strata Cloud Manager - SCM, Customer Support portal etc).
Prerequisites
Below are the prerequisites to enable a third-party IdP for your domain:
-
A Super User must assign you the SSO Administrator (SSOA) role in the CSP to be able to configure third-party IdP access for your account.
-
You must have admin access on the Identity Provider to update the SSO configuration details provided by Palo Alto Networks.
-
You need one non-SSO administrator (SSOA) account for verification.
-
There is a new backend attribute “SSO Configuration” that acts as a master gatekeeper for the account. This attribute is not a visible toggle or switch in the CSP User Interface. You cannot manually enable/disable it directly.
For more information, please refer to the article: New User Interface: The "SSO Settings" Tab.-
Enabled (Backend): When this attribute is set to True, the "Configure Single Sign-On settings for your domain" link (indicated below) becomes enabled and clickable. The assigned "SSO Administrator" can then proceed to configure IDP settings.
-
Disabled (Backend): The configuration link is not visible, and no user can configure IDPs, even if they hold the "SSO Administrator" role.
-
To change this backend status from "Disabled" to "Enabled," you must utilize the "Request Approval" workflow in the SSO Settings tab. Click here for more information regarding the "SSO Settings" Tab.
-
-
Ensure the base URLs below are accessible from your network. You may need to work with your IT/Network team to whitelist these URLs.
Please note that the URLs listed below are base URLs only and not the full URLs that will be accessed when launching the SSO configuration portal from CSP.
If your organization has restrictive firewall rules, these base URLs will need to be whitelisted. Otherwise, no action is required.
Enable Third-Party Identity Provider
To enable a third-party IdP, navigate to the Account Details page in the CSP and click Configure Single Sign-On Settings for your domain under the SSO Settings section.
-
The link will take you to the portal where you can enter your Identity Provider details. If you see the error message below, please check if the URLs mentioned in Section Prerequisites above are accessible from your network, and that a firewall is not blocking these URLs.
An error occurred while processing your request. -
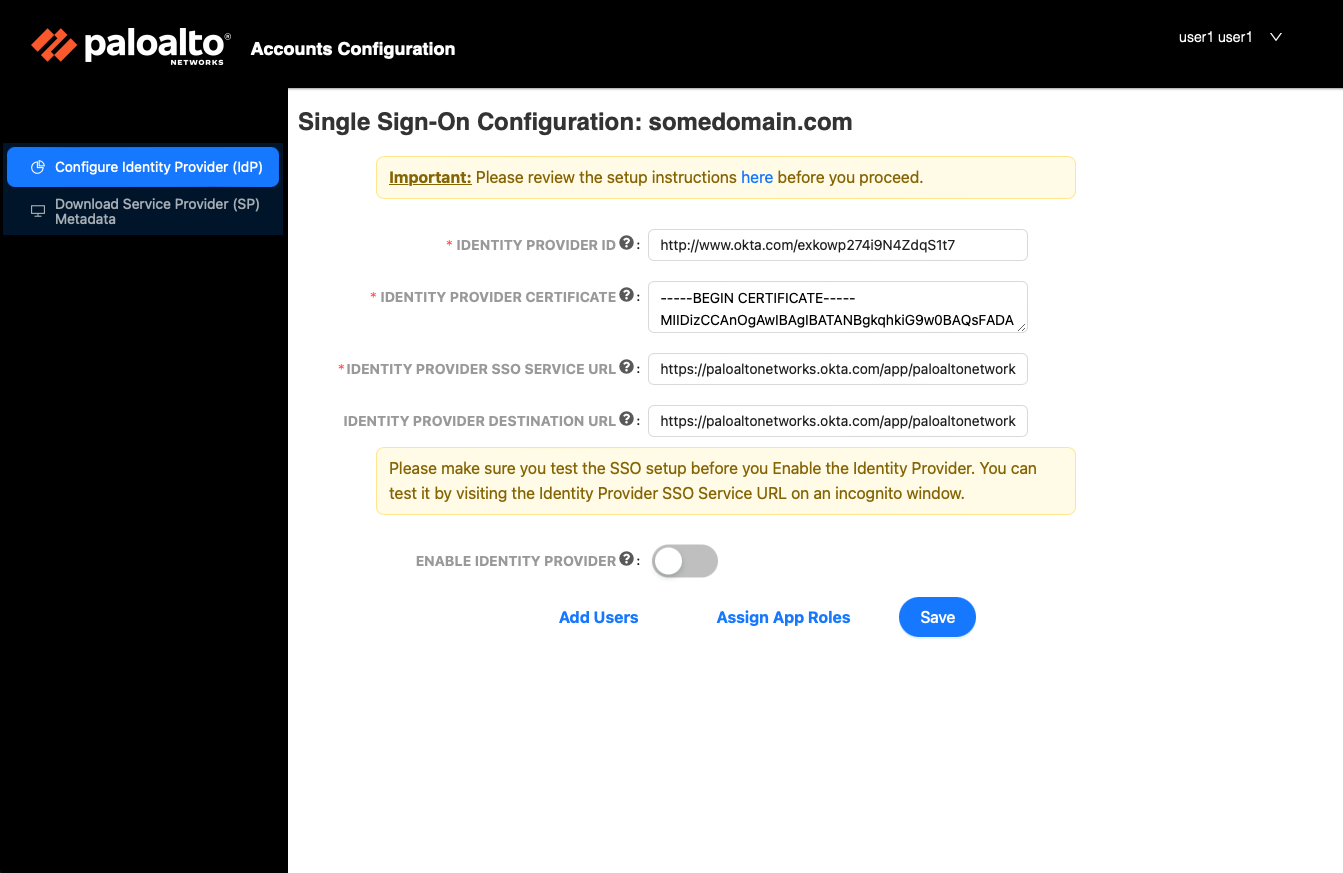
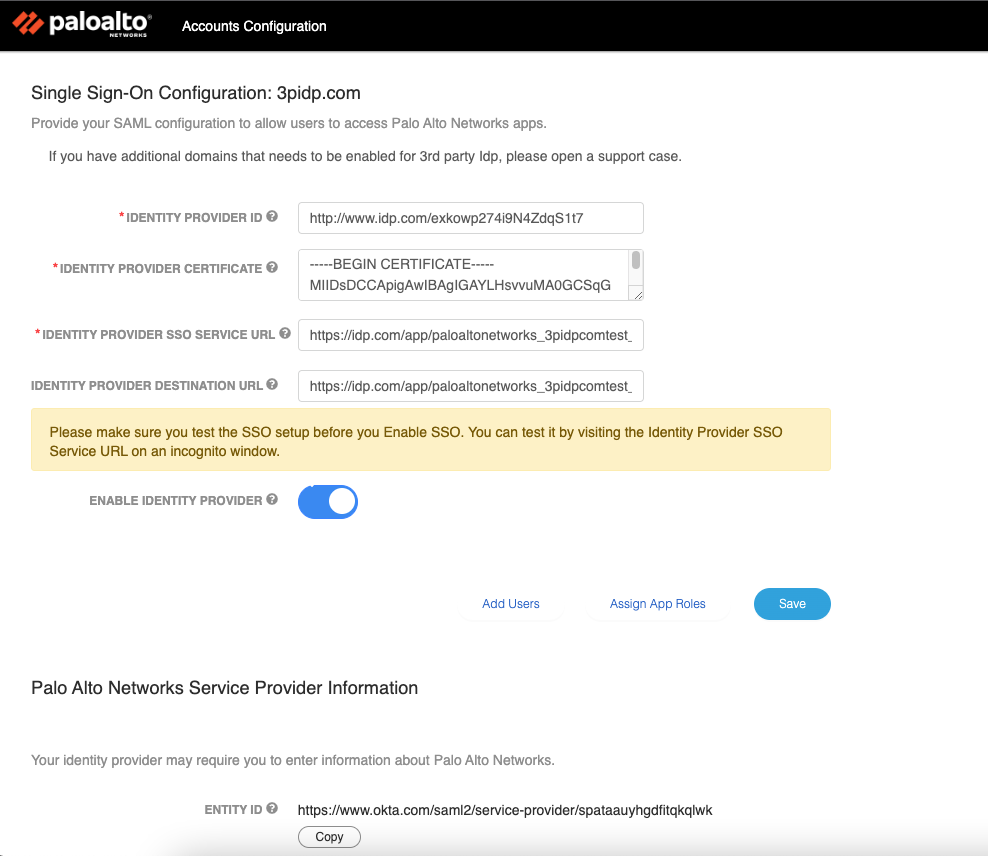
Enter your Identity Provider details in the form and click “Save”. Note that this will only save the configuration - it’s not activated yet. Please ensure that you test the SSO setup before you enable the Identity Provider for all users in the domain. If you want to generate the service provider configuration and update your identity provider first, please skip to the section “(Optional) Generate Service Provider (SP) Metadata” below, then return here once you are ready.
(The following sample image shows the screen for setting up Okta as an Identity Provider. However, the process is nearly identical to the steps followed for other Identity Providers)
-
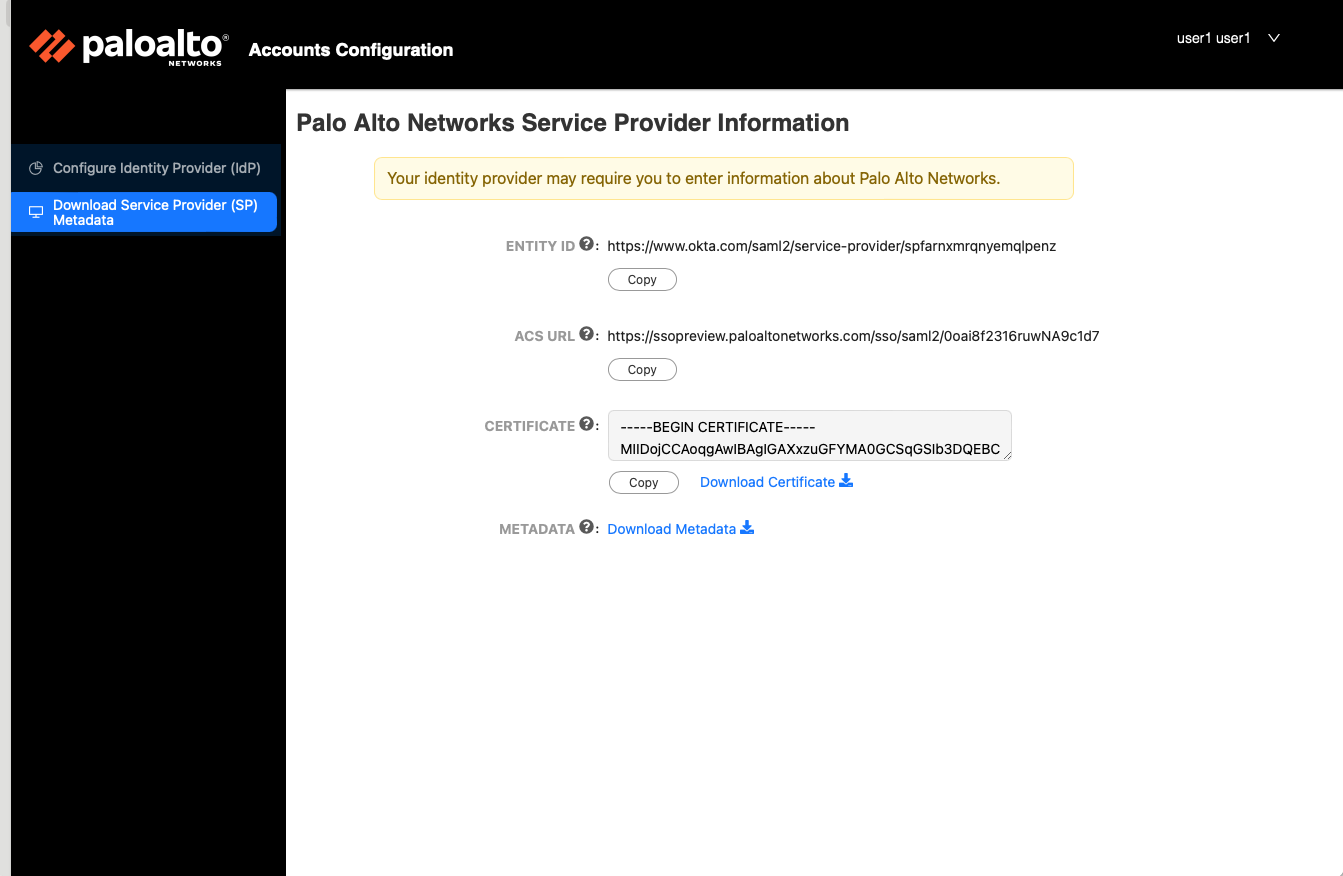
Once you Save the configuration, you’ll see the Palo Alto Networks Service Provider Information displayed under the “Download Service Provider (SP) Metadata section.
-
Update your Identity provider with the Palo Alto Networks information displayed on the page. Below are the details to be added to the SAML configuration.
(If your internal IT Team managing the Third-Party Identity Provider needs to complete the SAML configuration, please share this article with them and advise them to refer to this section.)
-
NameId:
-
Value: Configure email address to be sent in the Name Identifier
-
Format: Configure the NameId format as “Unspecified”
-
-
Additional SAML Attributes: Below are the additional SAML attributes
-
firstName: First Name of the user
-
lastName: Last Name of the user
-
Claim name: Unique user identifier (NameID), this has to be changed to user.mail keeping the nameid format as "Unspecified".
-
-
-
IMPORTANT: Test the SSO setup before you “Enable Identity Provider”. You can test the SSO setup using an identity provider-initiated flow.
-
Open an incognito window and enter the Identity Provider SSO Service URL
-
Login to your Identity provider with your enterprise credentials
-
After successful login, the Identity Provider will post a SAML to the Palo Alto Networks Service Provider
-
If there is an issue in the setup, you will see an error message on the screen
-
If the SSO handshake was successful, you will be taken to the home page of sso.paloaltonetworks.com
-
-
After you have verified that SSO works fine, you can “Enable Identity Provider”. This will enable the Identity provider for all users within that email domain, except SSO Administrators. SSO Administrator will have privileges to bypass IdP SSO to address SSO issues with support cases/user management.
Note: This will enable federation for all Palo Alto Networks applications on that email domain.
(Optional) Generate Service Provider (SP) Metadata
In some instances, you may want to generate the service provider configuration and update your identity provider first. If so, please follow the instructions below.
-
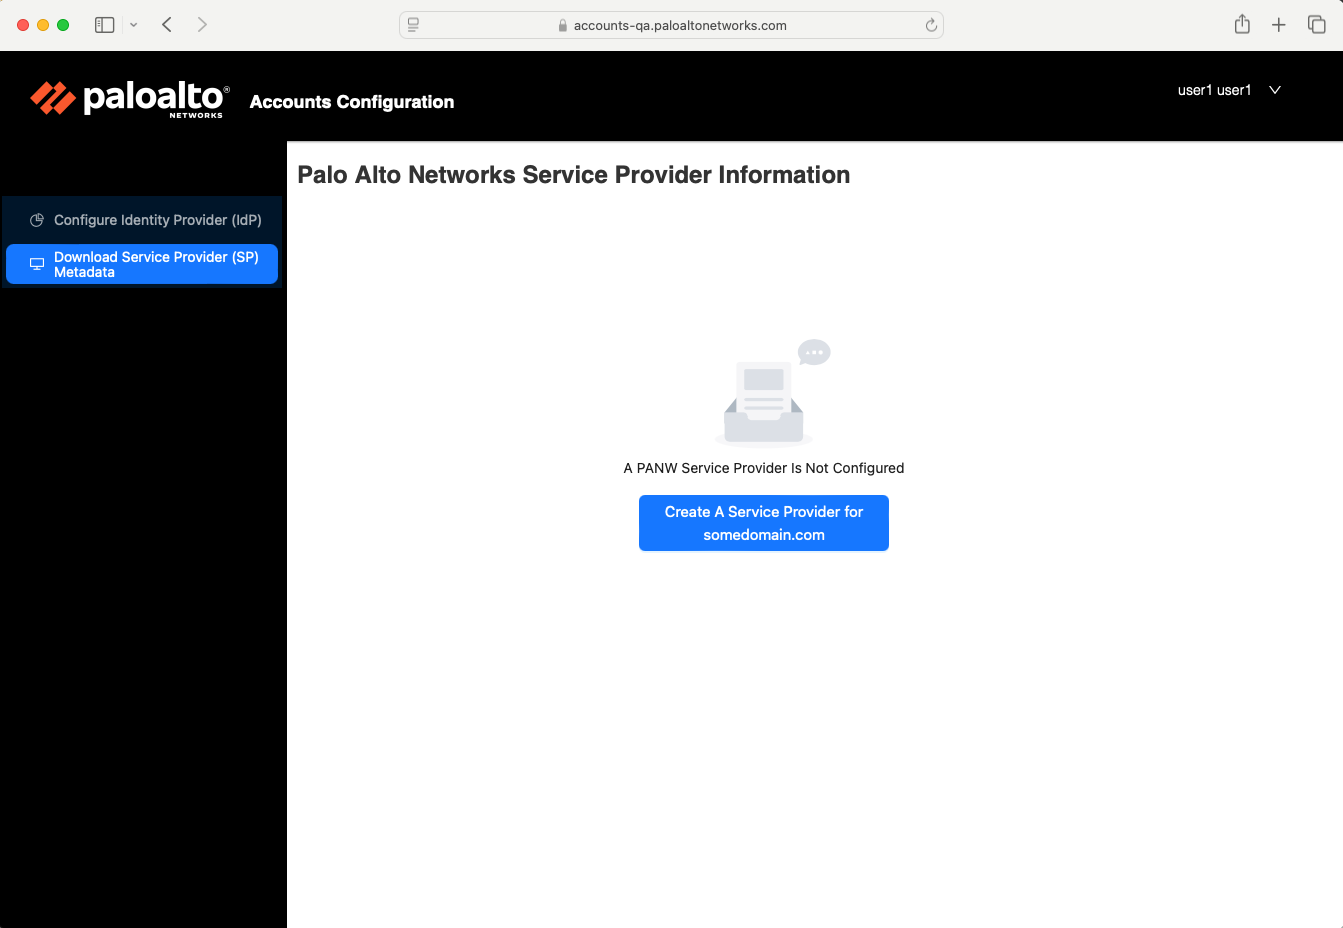
To generate the service provider metadata, navigate to the Account Details page in the CSP and click Configure Single Sign-On Settings for your domain under the User Access section.

-
The link will take you to the portal where you can generate Service Provider details. If you see the error message below, please check if the URLs mentioned in Section Prerequisites above are accessible from your network, and that a firewall is not blocking these URLs.
An error occurred while processing your request. -
Navigate to “Download Service Provider (SP) Metadata” on the left.
-
Click “Create a Service Provider”.
-
Update your Identity provider with the Palo Alto Networks information displayed on the page. Below are the details to be added to the SAML configuration.
(If your internal IT Team managing the Third-Party Identity Provider needs to complete the SAML configuration, please share this article with them and advise them to refer to this section.)-
NameId:
-
Value: Configure email address to be sent in the Name Identifier
-
Format: Configure the NameId format as “Unspecified”
-
-
Additional SAML Attributes: Below are the additional SAML attributes
-
firstName: First Name of the user
-
lastName: Last Name of the user
-
Claim name: Unique user identifier (NameID), this has to be changed to user.mail keeping the nameid format as "Unspecified".
-
-
Once you are ready, you may return to the section above to enable third-party IdP.
Verify SSO login
Once you Enable Identity Provider, all users (except SSO Administrators) will be forced to log in via SSO. You can verify the end-to-end setup by following the steps below.
Open a new incognito browser window and access the support portal URL.
-
Provide an Email address on sign in page (not a SSO Administrator Email address)
-
You will be redirected to your IdP login page for authentication
-
After authentication, you should be taken to the Customer Support Portal home page.
FAQs
Why am I unable to access the SSO Settings page?
If you see the following error message: "An error occurred while processing your request", please check if the URLs below are added to your allow list on your network, and that no firewall is blocking access.
https://accounts.paloaltonetworks.com/
https://accounts.api.paloaltonetworks.com/
Will there be any outage when I switch to third-party IdP?
Yes, there may be a potential outage of approximately 1 hour while the SSO Administrator configures and activates the Identity Provider. If tested and done carefully, there will be no outage.
Who do I contact if I run into SSO issues after migration?
If you have issues, please open an Admin case at https://support.paloaltonetworks.com. If you are unable to log in, please use the “Need Help?” option.
Are there other changes in the way users are added to the support portal?
No. There is no change to this process with one exception: the Account Registration Link cannot be used for adding users with a third-party enabled domain.
JIT provisioning and automation in user creation between CSP and the third-party IdP platform is not supported at this point. Users have to be added manually on CSP.
Can I configure Single Sign-On (SSO) for specific user groups or CSP accounts in the Palo Alto Customer Support Portal?
No, Palo Alto Networks Customer Support Portal supports Single Sign-On (SSO) configuration only at the domain level. It cannot be configured for specific user groups or individual CSP accounts. The SSO integration applies to all users within the domain, and there is no support for enabling or restricting SSO for individual customer support portal accounts or groups.
Why is the Identity Provider rejecting the SAML Response?
Be sure to configure the NameID format as "Unspecified". Service Provider signs the SAML Request and sends the NameID format as "Unspecified". This setting must match with what is configured in the Identity Provider.
How to renew the SSO IdP Certificate
Below are the Prerequisites to edit SSO settings and renew IdP certificate:
-
You must have the SSO Administrator role in the CSP to be able to configure third-party IdP access for your account.
-
You must have admin access on the Identity Provider to update the SSO configuration details provided by Palo Alto Networks.
-
You need one non-SSO Administrator account for verification.
-
Ensure the URLs below are accessible from your network. You may need to work with your IT/Network team to whitelist these URLs.
https://accounts.paloaltonetworks.com/
https://accounts.api.paloaltonetworks.com/
Steps to renew the IdP certificate:
-
Download the Base 64 certificate from your Identity Provider (IdP)
-
Login to the support portal - https://support.paloaltonetworks.com
-
Navigate to the Account Details page and click View Single-Sign-On Settings for your domain.
-
Take a backup of the existing identity provider certificate from the SSO settings
-
Copy and Paste the new Base64 IdP certificate (i.e. downloaded from step 1 from IdP) on the Identity provider certificate and save the configuration.
-
Test the SSO integration.
-
In case of issues, revert the certificate changes and reach out to support - You can open a support case at https://support.paloaltonetworks.com. If you are unable to log in, please use the “Need Help?” option.
Can I set up an alert if a user password has been changed
We do not support alerting mechanism on password reset.
An account super user for example is not going to get any alert if a member password has been changed.
How to configure Microsoft Entra ID?
Please follow the steps in the link below.