How to configure SDWAN: Basic connection
81815
Created On 05/27/22 05:10 AM - Last Modified 04/14/25 20:40 PM
Objective
Configure the basic SDWAN setup using the topology below.
Once the needed IPSEC tunnels are up, the routing will look like the below.
Environment
- Panorama with SD-WAN Plugin 2.1.2 installed
- PAN-OS 10.1.3
Procedure
- Add the devices to Panorama
- Panorama > Managed Devices > Summary > Add > Serial [paste Firewall's serial number] > click Generate Auth Key (copy and save it in a notepad) > OK > Commit to Panorama
- Configure Firewall to communicate with Panorama.
- Device > Setup > Management > Panorama Settings > click the gear Icon
- Panorama Server: provide Panorama's IP
- Auth Key: past the key from your notepad
- Click OK > Commit
- Repeat the first two steps for the rest of the other firewalls
- Create a template
- Panorama > Template > Add > Name: HUB1 > OK
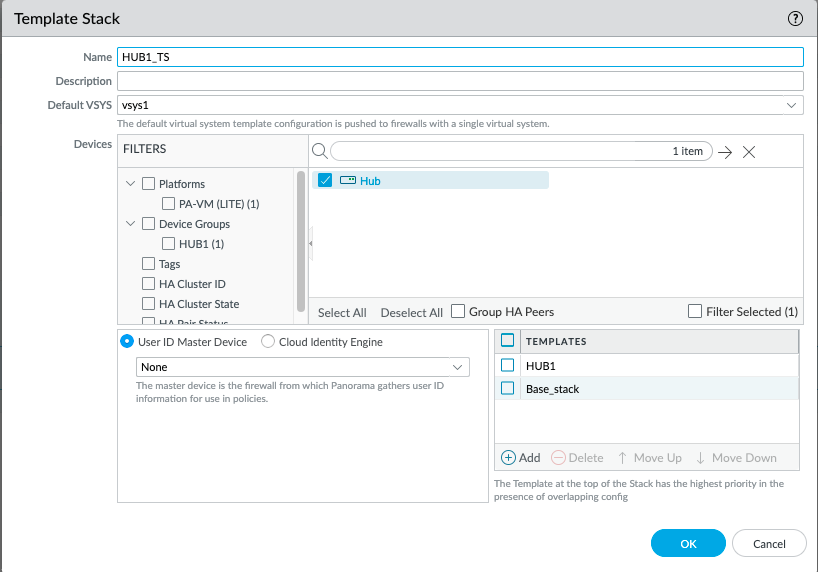
- Create a Template Stack by associating the device with a Template
Panorama > Template > Add Stack
Name: HUB1_TS
Devices: put a check mark next to the device
TEMPLATES > Add > HUB1 [you can opt to add other templates like seen below, or not]
Devices: put a check mark next to the device
TEMPLATES > Add > HUB1 [you can opt to add other templates like seen below, or not]
- Repeat steps 4 and 5 for the two branches
7. Create the Device Group and associate it with the template
Panorama > Device Groups > Add
Name: HUB1
Parent Device Group: Shared
NAME: put a check mark next to the device
REFERENCE TEMPLATE: Add > HUB1
Parent Device Group: Shared
NAME: put a check mark next to the device
REFERENCE TEMPLATE: Add > HUB1
8. Repeat step 7 for the two branches
- Configure the zones for all the devices; it is important that the zones highlighted below need to be configured the same as shown below. The said zones are the preconfigured zones that the sdwan plugin uses.
10. Configure the needed security policy to allow traffic to go thru SDWAN, and you can tighten the policy accordingly.
Policies> Security > Pre Rules
Policies> Security > Pre Rules
- Configure the Tags, which will eventually be used for Traffic Distribution Profile and Interfaces. For this article, we'll use four different links, which are Broadband-fast, Broadband-slow, MPLS, and Microwave.
You'll need to make sure that the tags are Shared for them to be visible on other parts of the SDWAN config parts.
Since the Tags are shared, you'll only need to configure it on one of the Device Group, and it will be reflected on the rest.
Objects > Tags > Add
Since the Tags are shared, you'll only need to configure it on one of the Device Group, and it will be reflected on the rest.
Objects > Tags > Add
TOPOLOGY: Connectivity
Note: The IP addresses in 172.16.x.x will be used for IPSEC tunnel build-up.
172.16.x (1 digit for the third octet) is used for point-to-multipoint links (ethernet)
172.16.xx (2 digits for the third octet) is used for point-to-point links (MPLS, Microwave)
With the above, later on in this article, we'll notice that tunnels form only with the same type.
172.16.x (1 digit for the third octet) is used for point-to-multipoint links (ethernet)
172.16.xx (2 digits for the third octet) is used for point-to-point links (MPLS, Microwave)
With the above, later on in this article, we'll notice that tunnels form only with the same type.
- Configure the SD-WAN interface profiles based on the above connectivity topology.
Since all firewalls have their unique interface profiles, below are the three different snapshots based on the setup.
Network > SD-WAN Interface Profile
- Configure the Ethernet interfaces based on connectivity topology.
Network > Interfaces > Ethernet
Topology: Routing
- Configure the routing part, we'll use the routing topology as a guide in configuring the device's BGP parameters.
Panorama > SD-WAN > Devices
- The VPN Cluster part is where we inform how the devices will behave in the network accordingly.
Panorama > SD-WAN > VPN Cluster > Add
Name: SDWANClustter
Type: Hub-Spoke
Branches: Branch1 & Branch2
Gateways: Hub
Type: Hub-Spoke
Branches: Branch1 & Branch2
Gateways: Hub
Hub Failover Priority: 1
Allow DIA VPN: Checked
Allow DIA VPN: Checked
- 16. Configure the VPN Address Pool, which will provide the necessary IP addresses to be used by each IPSEC tunnel.
Panorama > SD-WAN > VPN Clusters > VPN Address Pool
Results:
Remember the 1digit/2digits for the third octet? Now you'll see those come into play below.Note: sdwan.901 is the logical interface that is used for Direct Internet Access (DIA); in the above, the two ethernet interfaces are part of it.
Of the three sdwan interfaces, sdwan.901 is the only one that doesn't have an IPSEC tunnel in it.
Note: Although Branch1 has a single SD-WAN interface profile of ethernet. Since ethernet is a point-to-multipoint link type, two IPSEC tunnels are created for the hub.
NOTE: Highlighted above is Branch2's SD-WAN interface profile of Microwave, which is a private, point-to-point link, this type of link will only form an IPSEC tunnel to another Microwave link.
Other private, point-to-point links are MPLS, Satellite, and Other.
If you go back to the result of Branch1, we also have a single IPSEC tunnel via the MPLS link type, which is tunnel.936.
Topology: SDWAN interfaces (based from the above results)
Additional Information
How to configure SDWAN: Traffic Distribution using weighted session distribution
How to configure SDWAN: Traffic Distribution using best available path
How to configure SDWAN: Traffic Distribution using Top Down Priority
How to troubleshoot SD-WAN link down
SDWAN: Validation Error: At most 9 occurrences are allowed for interface/member